
Random Forest Algorithm
The Random Forest Algorithm is a powerful and widely used supervised machine learning algorithm. It can be applied to both Classification and Regression problems and is based on the concept of ensemble learning, where multiple models work together to produce more reliable predictions.
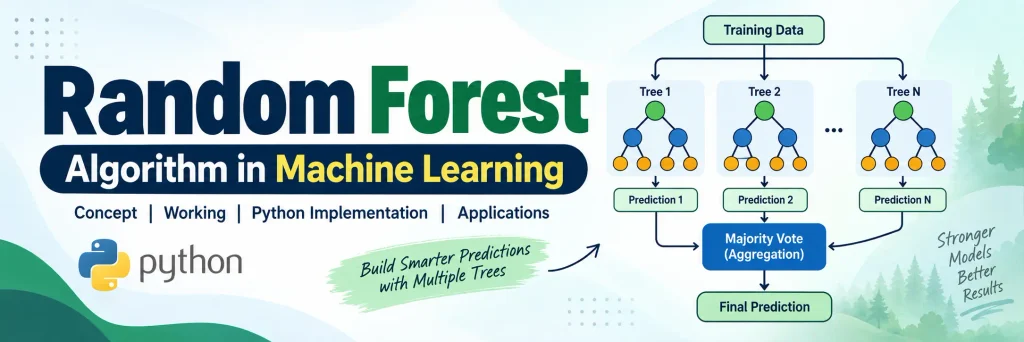
Instead of relying on a single decision tree, Random Forest combines the predictions of multiple decision trees. Each tree is trained using different subsets of the training data, and their individual predictions are combined to produce the final result. In simple terms, Random Forest collects the predictions from multiple trees and makes a final decision based on their combined output.
Tip: Having a basic understanding of Decision Trees can make it easier to understand how Random Forest works.
Complete Advance AI Topics: Click Here
SQL Tutorial: Click Here
Understanding Random Forest at a Glance
At its core, Random Forest is an ensemble of decision trees. Each tree produces its own prediction, and the final prediction is determined using majority voting for classification problems or the average of predictions for regression problems.
Increasing the number of trees can generally make the model more stable and reduce the risk of overfitting, although simply adding more trees does not always guarantee higher accuracy.
Key Assumptions in Random Forest
Random Forest works effectively when its individual trees provide diverse predictions. Some important considerations include:
- The dataset should contain useful predictive features so that the trees can learn meaningful relationships instead of making essentially random predictions.
- The individual trees should not be too highly correlated. Diversity among trees helps the ensemble produce more robust and accurate predictions.
Why Use Random Forest?
Random Forest provides several benefits compared with using a single decision tree:
- Good predictive performance on many classification and regression tasks
- Handles large datasets and datasets with many features effectively
- Less prone to overfitting than an individual decision tree in many situations
- Versatile because it can be used for both Classification and Regression
How Does the Random Forest Algorithm Work?
The working of Random Forest can be understood in two major phases: building the forest and making predictions.
Phase 1: Building the Forest
- Randomly select samples from the training dataset.
- Build a Decision Tree using the selected samples and randomly considered features at each split.
- Repeat these steps to create multiple decision trees.
Phase 2: Making Predictions
- Pass the new data through every decision tree in the forest.
- Each tree produces its own prediction.
- For classification, the final result is generally determined by majority voting.
- For regression, the predictions from the trees are generally averaged to obtain the final result.
Example: Fruit Image Classification
Suppose we have a dataset containing images of different fruits. Instead of training one decision tree, Random Forest creates multiple trees using different samples and feature combinations.
When a new fruit image is provided, each tree makes its own prediction. If most trees predict that the image represents an apple, the Random Forest model will classify the image as an apple.
Real-World Applications of Random Forest
Random Forest can be applied across a wide range of industries:
- Banking: Credit risk analysis
- Medicine: Disease prediction and diagnosis
- Land Use: Crop classification using satellite data
- Marketing: Predicting customer behavior and trends
Advantages of Random Forest
- Can handle both classification and regression problems.
- Works well with large datasets and high-dimensional data.
- Generally reduces overfitting compared with using a single decision tree.
- Provides robust performance when working with noisy datasets.
- Can estimate feature importance, helping identify influential features.
Disadvantages of Random Forest
- It can require more computational resources than a single decision tree because multiple trees need to be trained.
- Compared with a single Decision Tree, Random Forest can be more difficult to interpret.
- Large forests may require more memory and prediction time.
Random Forest Algorithm Using Python: Step-by-Step Implementation
Let’s now look at a Python implementation using the user_data.csv dataset.
Step 1: Data Pre-Processing
# Import necessary libraries
import numpy as np
import matplotlib.pyplot as plt
import pandas as pd

# Load dataset
dataset = pd.read_csv('user_data.csv')

# Extract features and target
X = dataset.iloc[:, [2, 3]].values
y = dataset.iloc[:, 4].values

# Split into training and test sets
from sklearn.model_selection import train_test_split

X_train, X_test, y_train, y_test = train_test_split(
    X, y, test_size=0.25, random_state=0
)

# Feature scaling
from sklearn.preprocessing import StandardScaler

sc = StandardScaler()
X_train = sc.fit_transform(X_train)
X_test = sc.transform(X_test)
Step 2: Fitting Random Forest to the Training Set
from sklearn.ensemble import RandomForestClassifier

# Build the model
classifier = RandomForestClassifier(
    n_estimators=10,
    criterion='entropy',
    random_state=0
)

classifier.fit(X_train, y_train)
Here, n_estimators specifies the number of decision trees in the forest. The criterion='entropy' parameter uses entropy to evaluate the quality of splits based on information gain.
Step 3: Predicting the Test Results
y_pred = classifier.predict(X_test)The trained Random Forest model uses the test data to generate predictions.
Step 4: Evaluating with Confusion Matrix
from sklearn.metrics import confusion_matrix

cm = confusion_matrix(y_test, y_pred)
print(cm)
The confusion matrix helps evaluate the classification model by showing the number of correct and incorrect predictions for each class.
Step 5: Visualizing the Training Set Results
from matplotlib.colors import ListedColormap

X_set, y_set = X_train, y_train

X1, X2 = np.meshgrid(
    np.arange(
        start=X_set[:, 0].min() - 1,
        stop=X_set[:, 0].max() + 1,
        step=0.01
    ),
    np.arange(
        start=X_set[:, 1].min() - 1,
        stop=X_set[:, 1].max() + 1,
        step=0.01
    )
)

plt.contourf(
    X1,
    X2,
    classifier.predict(
        np.array([X1.ravel(), X2.ravel()]).T
    ).reshape(X1.shape),
    alpha=0.75,
    cmap=ListedColormap(('purple', 'green'))
)

plt.xlim(X1.min(), X1.max())
plt.ylim(X2.min(), X2.max())

for i, j in enumerate(np.unique(y_set)):
    plt.scatter(
        X_set[y_set == j, 0],
        X_set[y_set == j, 1],
        c=ListedColormap(('purple', 'green'))(i),
        label=j
    )

plt.title('Random Forest Algorithm (Training Set)')
plt.xlabel('Age')
plt.ylabel('Estimated Salary')
plt.legend()
plt.show()
This visualization displays the decision boundaries learned by the Random Forest model on the training dataset.
Step 6: Visualizing the Test Set Results
X_set, y_set = X_test, y_test

X1, X2 = np.meshgrid(
    np.arange(
        start=X_set[:, 0].min() - 1,
        stop=X_set[:, 0].max() + 1,
        step=0.01
    ),
    np.arange(
        start=X_set[:, 1].min() - 1,
        stop=X_set[:, 1].max() + 1,
        step=0.01
    )
)

plt.contourf(
    X1,
    X2,
    classifier.predict(
        np.array([X1.ravel(), X2.ravel()]).T
    ).reshape(X1.shape),
    alpha=0.75,
    cmap=ListedColormap(('purple', 'green'))
)

plt.xlim(X1.min(), X1.max())
plt.ylim(X2.min(), X2.max())

for i, j in enumerate(np.unique(y_set)):
    plt.scatter(
        X_set[y_set == j, 0],
        X_set[y_set == j, 1],
        c=ListedColormap(('purple', 'green'))(i),
        label=j
    )

plt.title('Random Forest Algorithm (Test Set)')
plt.xlabel('Age')
plt.ylabel('Estimated Salary')
plt.legend()
plt.show()
This visualization shows how the trained Random Forest model classifies the test data and where its decision boundaries are located.
Download New Real Time Projects :- Click here
Final Thoughts
Random Forest is a powerful ensemble learning algorithm that can deliver strong results across a wide range of machine learning problems. Its ability to combine multiple decision trees makes it more robust than relying on a single tree, while its support for both classification and regression makes it highly versatile.
Whether you’re building a model to predict user behavior, detect fraud, or analyze health records, Random Forest can be a useful addition to your machine learning toolbox.
Pro Tip: Experiment with the number of trees using the n_estimators parameter and evaluate the model on validation data to find a suitable balance between performance and computational cost.
Stay tuned for more tutorials, hands-on projects, and real-world machine learning insights.
Keywords: random forest algorithm in machine learning, random forest algorithm geeksforgeeks, random forest algorithm python, random forest algorithm example, random forest regression, random forest algorithm formula, random forest vs decision tree, random forest algorithm in machine learning example