
Face Recognition based Attendance System
In this era of technological progress , traditional attendance-taking methods have undergone a remarkable transformation, becoming more efficient, precise, and secure. Among these advancements, the “Face Recognition based Attendance System” stands out as a noteworthy innovation. Powered by Python, this state-of-the-art technology not only simplifies the often tedious task of attendance management but also introduces an additional layer of security and convenience to the process.
Building a Face Recognition based Attendance System involves several steps, including data collection, preprocessing, model training, and system integration.
1. Data Collection:
- Collect a dataset of facial images for the individuals whose attendance you want to track. Ensure that the dataset contains a sufficient number of images per person under different lighting conditions, angles, and facial expressions to improve the model’s accuracy.
- Label each image with the corresponding individual’s name or ID.
2. Data Preprocessing:
- Resize and normalize the facial images to a consistent size.
- Apply face detection to locate and extract faces from images.
- Augment the dataset to increase its size and diversity (e.g., rotate, flip, or change brightness/contrast).
Read More :https://updategadh.com/java-project/top-10-real-time-java-projects/
3. Model Selection:
- Choose a pre-trained deep learning model for face recognition, such as FaceNet, VGGFace, or ArcFace. These models are trained on large-scale datasets and have proven to be effective for face recognition tasks.

4. Model Training:
- Fine-tune the chosen model using your labeled dataset. This process involves adjusting the model’s weights to recognize the individuals in your dataset.
- Use techniques like triplet loss or contrastive loss to train the model to learn face embeddings (dense vector representations of faces) that can be used for recognition.
5. Face Recognition:
- Implement a function to perform face recognition using the trained model. Given a new face image, extract its face embedding and compare it to the embeddings of known individuals using a similarity metric (e.g., cosine similarity or Euclidean distance).
- Set a threshold to determine when a match is considered a positive recognition.
6. Attendance Tracking:
- Create a database to store attendance records. Each record should include the individual’s name or ID, timestamp, and any additional relevant information.
- When a face is recognized, record the attendance entry in the database.
Read more –https://updategadh.com/projects/c-projects/top-10-real-time-c-projects/
7. User Interface:
- Develop a user-friendly interface for users to interact with the attendance system. This could be a web-based dashboard or a mobile app.
- Provide options for administrators to view and export attendance records.
8. Deployment:
- Deploy the system in your desired environment, such as a workplace, school, or event venue.
- Ensure that the hardware setup, including cameras and servers, is optimized for real-time performance.

9. Testing and Validation:
- Test the system extensively with a diverse set of users and conditions to assess its accuracy and reliability.
- Fine-tune the recognition threshold and other parameters to achieve the desired level of performance.
10. Maintenance and Updates:
- Regularly update the dataset and retrain the model to account for changes in appearance over time.
- Keep the system’s software and hardware up to date to address security and performance issues.
“🐍👥 Created a Python-based attendance system with integrated face recognition for effortless attendance tracking. This project features a user-friendly Graphical User Interface (GUI) created using tkinter, ensuring accessibility for all users. 🖥️📊📋”
Read more :https://docs.python.org/
Technology Stack:
- tkinter: Used for the entire graphical user interface (GUI).
- OpenCV: Employed for capturing images and conducting face recognition, specifically using the
cv2.face.LBPHFaceRecognizer_create()method. - CSV, Numpy, Pandas, datetime, etc.: Utilized for various other functionalities and data processing purposes.
Key Features:
- User-Friendly Interface: The application boasts an intuitive and user-friendly GUI, making it accessible to users with varying levels of technical expertise.
- Secure Registration: Ensures security through password protection when registering new individuals, safeguarding sensitive information.
- Data Management: Automatically creates and updates a CSV file to store detailed student information during registration, ensuring data integrity.
- Daily Attendance Tracking: Generates a new CSV file each day to record attendance, accurately marking attendance with the date and timestamp.
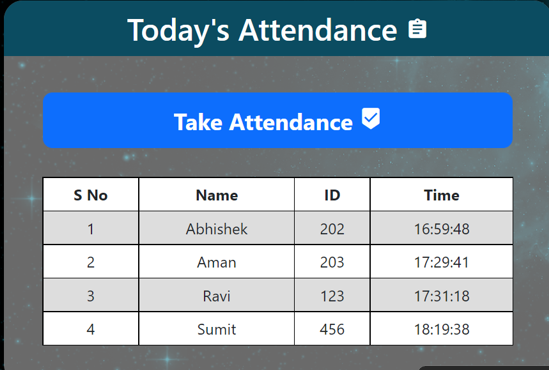
- Real-Time Attendance Display: Provides live updates on attendance for the current day in a tabular format on the main screen, including student ID, name, date, and time. This feature keeps users informed about the ongoing attendance session in real time.
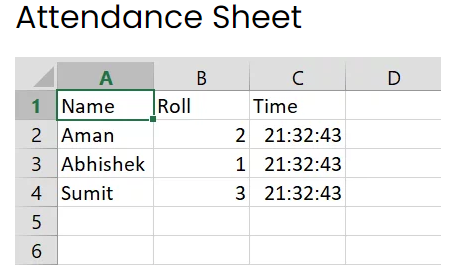
Attendance Sheet
Code files for our Face Recognition based Attendance System
app.py
import cv2
import os
from flask import Flask, request, render_template
from datetime import date
from datetime import datetime
import numpy as np
from sklearn.neighbors import KNeighborsClassifier
import pandas as pd
import joblib

#### Defining Flask App
app = Flask(__name__)

#### Saving Date today in 2 different formats
datetoday = date.today().strftime("%m_%d_%y")
datetoday2 = date.today().strftime("%d-%B-%Y")

#### Initializing VideoCapture object to access WebCam
face_detector = cv2.CascadeClassifier('haarcascade_frontalface_default.xml')

#### If these directories don't exist, create them
if not os.path.isdir('Attendance'):
    os.makedirs('Attendance')
if not os.path.isdir('static'):
    os.makedirs('static')
if not os.path.isdir('static/faces'):
    os.makedirs('static/faces')
if f'Attendance-{datetoday}.csv' not in os.listdir('Attendance'):
    with open(f'Attendance/Attendance-{datetoday}.csv', 'w') as f:
        f.write('Name,Roll,Time')


#### get a number of total registered users
def totalreg():
    return len(os.listdir('static/faces'))


#### extract the face from an image
def extract_faces(img):
    try:
        if img.shape != (0, 0, 0):
            gray = cv2.cvtColor(img, cv2.COLOR_BGR2GRAY)
            face_points = face_detector.detectMultiScale(gray, 1.3, 5)
            return face_points
        else:
            return []
    except:
        return []


#### Identify face using ML model
def identify_face(facearray):
    model = joblib.load('static/face_recognition_model.pkl')
    return model.predict(facearray)


#### A function which trains the model on all the faces available in faces folder
def train_model():
    faces = []
    labels = []
    userlist = os.listdir('static/faces')
    for user in userlist:
        for imgname in os.listdir(f'static/faces/{user}'):
            img = cv2.imread(f'static/faces/{user}/{imgname}')
            resized_face = cv2.resize(img, (50, 50))
            faces.append(resized_face.ravel())
            labels.append(user)
    faces = np.array(faces)
    knn = KNeighborsClassifier(n_neighbors=5)
    knn.fit(faces, labels)
    joblib.dump(knn, 'static/face_recognition_model.pkl')


#### Extract info from today's attendance file in attendance folder
def extract_attendance():
    df = pd.read_csv(f'Attendance/Attendance-{datetoday}.csv')
    names = df['Name']
    rolls = df['Roll']
    times = df['Time']
    l = len(df)
    return names, rolls, times, l


#### Add Attendance of a specific user
def add_attendance(name):
    username = name.split('_')[0]
    userid = name.split('_')[1]
    current_time = datetime.now().strftime("%H:%M:%S")

    df = pd.read_csv(f'Attendance/Attendance-{datetoday}.csv')
    if int(userid) not in list(df['Roll']):
        with open(f'Attendance/Attendance-{datetoday}.csv', 'a') as f:
            f.write(f'\n{username},{userid},{current_time}')


def getallusers():
    userlist = os.listdir('static/faces')
    names = []
    rolls = []
    l = len(userlist)

    for i in userlist:
        name, roll = i.split('_')
        names.append(name)
        rolls.append(roll)

    return userlist, names, rolls, l


def deletefolder(duser):
    pics = os.listdir(duser)

    for i in pics:
        os.remove(duser + '/' + i)

    os.rmdir(duser)


################## ROUTING FUNCTIONS #########################

#### Our main page
@app.route('/')
def home():
    names, rolls, times, l = extract_attendance()
    return render_template('home.html', names=names, rolls=rolls, times=times, l=l, totalreg=totalreg(),
                           datetoday2=datetoday2)


#### This function will run when we click on Take Attendance Button
@app.route('/start', methods=['GET'])
def start():
    if 'face_recognition_model.pkl' not in os.listdir('static'):
        return render_template('home.html', totalreg=totalreg(), datetoday2=datetoday2,
                               mess='There is no trained model in the static folder. Please add a new face to continue.')

    ret = True
    cap = cv2.VideoCapture(0)
    while ret:
        ret, frame = cap.read()
        if len(extract_faces(frame)) > 0:
            (x, y, w, h) = extract_faces(frame)[0]
            cv2.rectangle(frame, (x, y), (x + w, y + h), (255, 0, 20), 2)
            face = cv2.resize(frame[y:y + h, x:x + w], (50, 50))
            identified_person = identify_face(face.reshape(1, -1))[0]
            add_attendance(identified_person)
            cv2.putText(frame, f'{identified_person}', (30, 30), cv2.FONT_HERSHEY_SIMPLEX, 1, (255, 0, 20), 2,
                        cv2.LINE_AA)
        cv2.imshow('Attendance', frame)
        if cv2.waitKey(1) == 27:
            break
    cap.release()
    cv2.destroyAllWindows()
    names, rolls, times, l = extract_attendance()
    return render_template('home.html', names=names, rolls=rolls, times=times, l=l, totalreg=totalreg(),
                           datetoday2=datetoday2)


#### This function will run when we add a new user
@app.route('/add', methods=['GET', 'POST'])
def add():
    newusername = request.form['newusername']
    newuserid = request.form['newuserid']
    userimagefolder = 'static/faces/' + newusername + '_' + str(newuserid)
    if not os.path.isdir(userimagefolder):
        os.makedirs(userimagefolder)
    i, j = 0, 0
    cap = cv2.VideoCapture(0)
    while 1:
        _, frame = cap.read()
        faces = extract_faces(frame)
        for (x, y, w, h) in faces:
            cv2.rectangle(frame, (x, y), (x + w, y + h), (255, 0, 20), 2)
            cv2.putText(frame, f'Images Captured: {i}/50', (30, 30), cv2.FONT_HERSHEY_SIMPLEX, 1, (255, 0, 20), 2,
                        cv2.LINE_AA)
            if j % 10 == 0:
                name = newusername + '_' + str(i) + '.jpg'
                cv2.imwrite(userimagefolder + '/' + name, frame[y:y + h, x:x + w])
                i += 1
            j += 1
        if j == 500:
            break
        cv2.imshow('Adding new User', frame)
        if cv2.waitKey(1) == 27:
            break
    cap.release()
    cv2.destroyAllWindows()
    print('Training Model')
    train_model()
    names, rolls, times, l = extract_attendance()
    return render_template('home.html', names=names, rolls=rolls, times=times, l=l, totalreg=totalreg(),
                           datetoday2=datetoday2)


#### Our main function which runs the Flask App
if __name__ == '__main__':
    app.run(debug=True)

#### Visit www.updategadh.com for
home.html
<!doctype html>
<html lang="en">

<style type='text/css'>
    * {
        padding: 0;
        margin: 0;
        font-family: 'Segoe UI', Tahoma, Geneva, Verdana, sans-serif;
    }


    body {
        background-image: url('https://cutewallpaper.org/21/1920-x-1080-gif/1920x1080-Wallpapercartoon-Wallpapers-Driverlayer-Search-.gif');
        background-size: cover;
        font-family: sans-serif;
        margin-top: 40px;
        height: 100vh;
        padding: 0;
        margin: 0;
    }

    table {
        border: 1px;
        font-family: arial, sans-serif;
        border-collapse: collapse;
        width: 86%;
        margin: auto;
    }

    td,
    th {
        border: 1px solid black !important;
        padding: 5px;
    }

    tr:nth-child(even) {
        background-color: #dddddd;
    }
</style>


<head>
    <!-- Required meta tags -->
    <meta charset="utf-8">
    <meta name="viewport" content="width=device-width, initial-scale=1">
    <link rel="stylesheet" href="https://fonts.googleapis.com/icon?family=Material+Icons">

    <!-- Bootstrap CSS -->
    <link href="https://cdn.jsdelivr.net/npm/bootstrap@5.0.0-beta3/dist/css/bootstrap.min.css" rel="stylesheet"
        integrity="sha384-eOJMYsd53ii+scO/bJGFsiCZc+5NDVN2yr8+0RDqr0Ql0h+rP48ckxlpbzKgwra6" crossorigin="anonymous">

    <title>Face Recognition Based Attendance System</title>
</head>

<body>

    <div class='mt-3 text-center'>
        <h1 style="width: auto;margin: auto;color: white;padding: 11px;font-size: 44px;">Face Recognition Based
            Attendance System</h1>
    </div>

    {% if mess%}
    <p class="text-center" style="color: red;font-size: 20px;">{{ mess }}</p>
    {% endif %}

    <div class="row text-center" style="padding: 20px;margin: 20px;">

        <div class="col"
            style="border-radius: 20px;padding: 0px;background-color:rgb(211,211,211,0.5);margin:0px 10px 10px 10px;min-height: 400px;">
            <h2 style="border-radius: 20px 20px 0px 0px;background-color: #0b4c61;color: white;padding: 10px;">Today's
                Attendance <i class="material-icons">assignment</i></h2>
            <a style="text-decoration: none;max-width: 300px;" href="/start">
                <button
                    style="font-size: 24px;font-weight: bold;border-radius: 10px;width:490px;padding: 10px;margin-top: 30px;margin-bottom: 30px;"
                    type='submit' class='btn btn-primary'>Take Attendance <i
                        class="material-icons">beenhere</i></button>
            </a>
            <table style="background-color: white;">
                <tr>
                    <td><b>S No</b></td>
                    <td><b>Name</b></td>
                    <td><b>ID</b></td>
                    <td><b>Time</b></td>
                </tr>
                {% if l %}

                {% for i in range(l) %}
                <tr>
                    <td>{{ i+1 }}</td>
                    <td>{{ names[i] }}</td>
                    <td>{{ rolls[i] }}</td>
                    <td>{{ times[i] }}</td>
                </tr>
                {% endfor %}
                {% endif %}
            </table>

        </div>

        <div class="col"
            style="border-radius: 20px;padding: 0px;background-color:rgb(211,211,211,0.5);margin:0px 10px 10px 10px;height: 400px;">
            <form action='/add' method="POST" enctype="multipart/form-data">
                <h2 style="border-radius: 20px 20px 0px 0px;background-color: #0b4c61;color: white;padding: 10px;">Add
                    New User <i class="material-icons">control_point_duplicate</i></h2>
                <label style="font-size: 20px;"><b>Enter New User Name*</b></label>
                <br>
                <input type="text" id="newusername" name='newusername'
                    style="font-size: 20px;margin-top:10px;margin-bottom:10px;" required>
                <br>
                <label style="font-size: 20px;"><b>Enter New User Id*</b></label>
                <br>
                <input type="number" id="newusereid" name='newuserid'
                    style="font-size: 20px;margin-top:10px;margin-bottom:10px;" required>
                <br>
                <button style="width: 232px;margin-top: 20px;font-size: 20px;" type='submit' class='btn btn-dark'>Add
                    New User
                </button>
                <br>
                <h5 style="padding: 25px;"><i>Total Users in Database: {{totalreg}}</i></h5>
            </form>
        </div>

    </div>

</body>

</html>