
Face Recognition Based Attendance System
Introduction
In today’s busy world, old-style attendance systems are not so effective anymore. Many companies and schools now use new technologies like face recognition to make attendance easier and faster.Face recognition uses your facial features to identify and check who you are. It has changed the way we use machines and computers. This technology is now used in many areas, and one of the most useful is in attendance systems.
Making the Project
To create a face recognition-based attendance system, we first need to gather a dataset of facial images. This dataset will be used to train our machine learning model to recognize different faces. We can use libraries such as OpenCV and Dlib in Python to capture and process facial images.
Check more Projects :- https://www.youtube.com/@Decodeit2/playlists
Essential Features
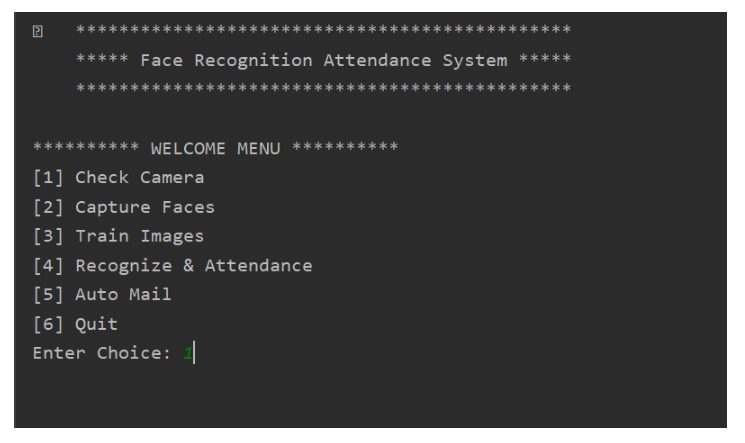
Features
- Check Camera: Utilize the application to verify the functionality of connected cameras.
- Capture Faces: Enable users to capture images containing faces for training and recognition purposes.
- Train Faces: Train the system to recognize specific faces by providing a dataset of images for each individual.
- Recognize Faces & Attendance: Employ face recognition algorithms to identify individuals and track attendance automatically.
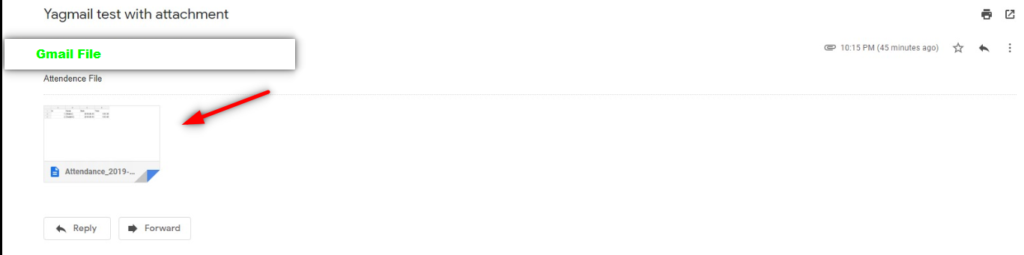
- Automatic Email: Implement functionality to send automatic emails, possibly for attendance reports or notifications.
Required Software and Tools
Modules Used:
- OpenCV (Contrib): A powerful library for computer vision tasks, including face detection and recognition.
- Pillow: Python Imaging Library (PIL) fork for image processing tasks.
- Numpy: Fundamental package for scientific computing with Python, used for array manipulation.
Pandas: Library for data manipulation and analysis, possibly used for handling data related to face recognition
Shutil: Utility functions for file operations, essential for managing files within the application.
CSV: Module for reading and writing CSV files, used for data storage and retrieval.
yagmail: Python library for sending emails through Gmail
- Numpy: Fundamental package for scientific computing with Python, used for array manipulation.
- Pillow: Python Imaging Library (PIL) fork for image processing tasks.
Face Recognition Algorithms:
- Haar Cascade: A machine learning-based approach used for object detection, particularly in images. Documentation
- LBPH (Local Binary Pattern Histogram): A face recognition algorithm used after face detection, known for its simplicity and effectiveness Documentation
Software Used:
- PyCharm .An Integrated Development Environment (IDE) for Python development. Download
- VS CODE: Another popular IDE for code editing and debugging. Download
Running the Web Application
To create an environment and install the required packages for running the project, follow these steps:
- Open the terminal or command line within your IDE (PyCharm or VS Code).
- Create a new Python virtual environment by executing the following command:
Copy code
python -m venv env- Activate the newly created environment. For Windows, use the following command:
Copy code
.\env\Scripts\activate- Now, your environment is activated, and you should see
(env)in your command prompt to indicate that. This means you are now working within your virtual environment.
- Now, your environment is activated, and you should see
- After activating the environment, you can install the required packages. Usually, you would have a
requirements.txtfile containing the list of packages and their versions. You can install them using pip with the following command:
- After activating the environment, you can install the required packages. Usually, you would have a
Copy code
pip install -r requirements.txtReplace requirements.txt with the actual name of your requirements file.
- Once all the packages are installed, you’re ready to run the program. You can execute your Python scripts within this activated environment, ensuring that they have access to the installed packages without conflicts.
After creating the environment on your project let’s install the necessary packages.
Copy code
pip install opencv-contrib-python
Copy code
pip install numpy
Copy code
pip install pandas
Copy code
pip install PillowCopy code
pip install pytest-shutilCopy code
pip install python-csvCopy code
pip install yagmailAfter creating the enviroment and installing the packages, open the IDE terminal/command line to run the program. Using the code below.
py main.py- Change the mail information
Step 5: Screenshots

Buy and Download [ Note: Project Only for Educational Purpose]
Download All Free Project :- Click here