Introduction Project: Expense Tracker using Python Django
Expense Tracker using Python Django is a complete program that has been intended to simplify and improve your financial management experience. This tool’s user-friendly design allows you to easily monitor and classify your spending, giving you a clear and structured snapshot of your financial activity. Expense Tracker goes above and beyond the fundamental capability of recording expenses by providing interesting charts and data.
These analytical capabilities allow customers to obtain useful insights into their spending habits, spot trends, and make smart budget decisions. Expense Tracker is a powerful and straightforward tool that helps both the monitoring and analysis of your costs, eventually leading to a more informed and productive financial life, whether you’re a careful planner or simply want to obtain a better knowledge of your financial habits.
Expense Tracker using Python Django is a program that allows you to manage and report your spending, as well as study charts and data about them. To create, read, edit, and remove costs allocated to a user, the project employs authentication and CRUD activities. The project also runs costs operations to provide monthly and daily expense averages, current versus previous month expense percentages, largest and smallest expenses by category, and more.
Expense Tracker using Python Django
How To Run Object
For installing the Django application clone the repository and cd inside the directory
cd django-expense-tracker
And run:
pipenv install
This will install the virtual environments and all dependencies.
First of all you have to install the front-end packages. In case you want to start the react server in order to see changes to the front-end faster just need to cd to the front-end/ directory and run:
So basically whenever you want to see your changes to the front-end displayed on the browser(without starting the react server and using only the django server), you have to save your changed files, cd to the front-end/ directory and run:
npm run build
on the front-end directory in order to update the build/ directory with your latest changes.
After that you need to cd to the root of the repository (where manage.py and this README file are located), and run:
python manage.py collectstatic
Then when asked by the prompt type ‘yes’ to overwrite existing staticfiles.
After that run:
python manage.py runserver
and you should see the changes you added previously now displayed on the page.
Installation – Cypress
For installing Cypress go to the e2e directory and run:
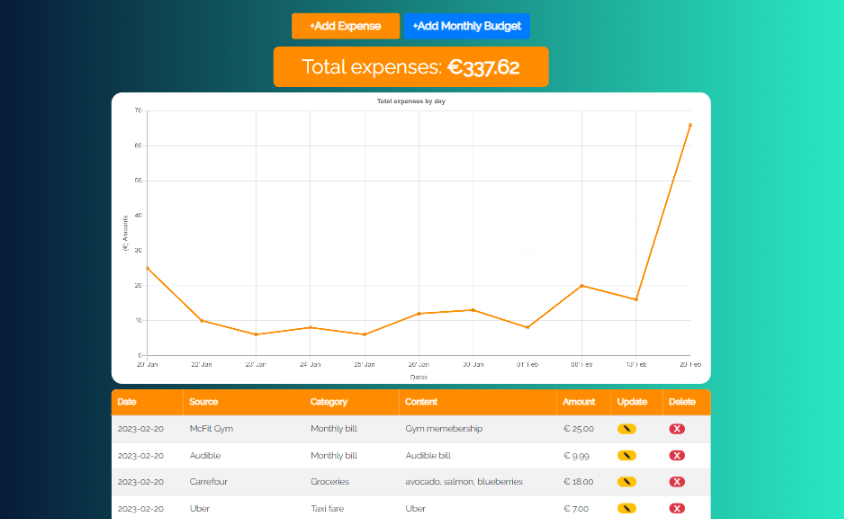
Adding Expenses :You may add an expense by selecting the “Add Expense” button, filling out the expense form, and submitting it. When you add an item, it will appear on the overall expenses element, the homepage’s line chart, and in the expenses table below.
Expense Tracker using Python Django
Adding a Monthly Budget You may create a monthly budget by clicking the Add Monthly Budget button, filling out the form, and submitting it. After you’ve added it, the budget UI will appear, including the budget progress bar, the monthly budget next to the current month’s spending, and the edit and delete options.
Expense Tracker using Python Django
Viewing Charts and Statistics Finally, by going to the Charts & information area, you may see charts and information regarding your spending. Expense charts with numbers broken down by month and week, as well as total and monthly spending broken down by category, may be found here. You may see your current monthly spending (together with options for amending or deleting the budget), as well as last month’s expenses and data such as monthly expense average, daily expense average, current versus last month expense percentage difference, and more.
Virus note: All files are scanned once-a-day by updategadh.com for viruses, but new viruses come out every day, so no prevention program can catch 100% of them FOR YOUR OWN SAFETY, PLEASE: 1. Re-scan downloaded files using your personal virus checker before using it. 2. NEVER, EVER run compiled files (.exe’s, .ocx’s, .dll’s etc.)–only run source code.
expense tracker using python expense tracker using python django expense tracker python expense tracker python github create an expense tracker in python python budget tracker python expense tracker django user tracking django expense tracker django expense tracker github php expense tracker open source using django with python python expense tracker project tracking personal finances using python
expense tracker using python expense tracker using python project ppt expense tracker python code expense tracker example expense tracker using python source code create an expense tracker in python easy to use expense tracker app expense tracker app using python top 10 expense tracker app
python expense tracker expense tracker python github expense tracker source code in python expense tracker python python budget tracker hsa expense tracker hsa expense tracking spreadsheet javascript expense tracker python expense tracker project expense tracker python project apps to track personal expenses q-learning python example r-tree python implementation r-tree python how to create an expense tracker in python uber expense tracking spreadsheet tracking personal finances using python yearly expense tracker printable python expense tracker project github fitness tracker python code