E-commerce Web Application on Java, JSP, MySQL, and Servlet:
Introduction
Are you looking to develop an efficient and user-friendly e-commerce web application? Look no further, as this article will guide you through the step-by-step process of creating a website powered by Java, JSP, MySQL, and Servlet. E-commerce has become an integral part of modern business, and having a robust online platform can help you tap into the vast potential of online sales. So let’s dive into the details and learn how to build an exceptional e-commerce web application.
Step 1: Making the Project
Before we begin coding, it’s essential to set up and organize your project properly. Follow these steps to create a new project:
- Open your preferred Integrated Development Environment (IDE) that supports Java, such as Eclipse or IntelliJ IDEA.
- Create a new Java project and name it according to your preference.
- Set up the project structure by creating the necessary directories for source code, configuration files, and web content.
Check 50+ JAVA Projects with Source Code
| Name | Required |
|---|---|
| Project Name | E-commerce Web Application on Java, JSP, MySQL (JSP) |
| Project Platform | JSP |
| Programming Language | Servlet/JSP/Bootstrap/HTML/MySQL |
| Front End | Html, css, js, jsp, |
| Back End | java, MySQL |
| IDE Tool | Eclipse Neon |
| Database | MySQL |
| Project Type | Web Application |
Step 2: Essential Features
Next, let’s focus on integrating important features into our e-commerce web application. These features will enhance the functionality and ensure an excellent user experience. Here are some essential features you should consider:
- User Authentication: Implement a secure login and registration system to allow users to create accounts and access personalized features.
- Product Catalog: Develop a well-organized product catalog that enables users to browse and search for products efficiently.
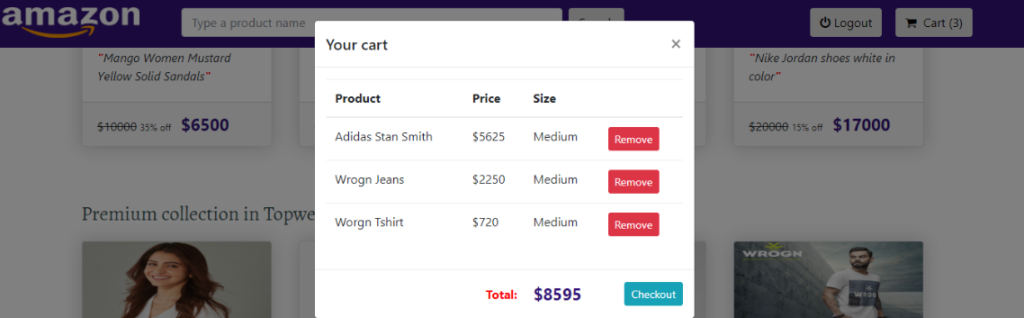
- Shopping Cart: Enable users to add products to their cart, make changes, and proceed to the checkout process seamlessly.
- Payment Gateway Integration: Integrate a reliable payment gateway to facilitate secure and hassle-free online transactions.
- Order Management: Develop a system to manage incoming orders, track shipment, and generate invoices.
- User Reviews and Ratings: Allow users to share their feedback on products and rate their shopping experience.
Step 3: Required Software and Tools
To work on this project, you will need several software and tools that ensure smooth development and deployment. Here is a list of essential requirements:
- Java Development Kit (JDK): Install the latest JDK version to compile and run Java code.
- IDE: Choose a suitable IDE, such as Eclipse or IntelliJ IDEA, to facilitate coding and debugging.
- Apache Tomcat: Install Tomcat, a popular Java Servlet container, to run your web application.
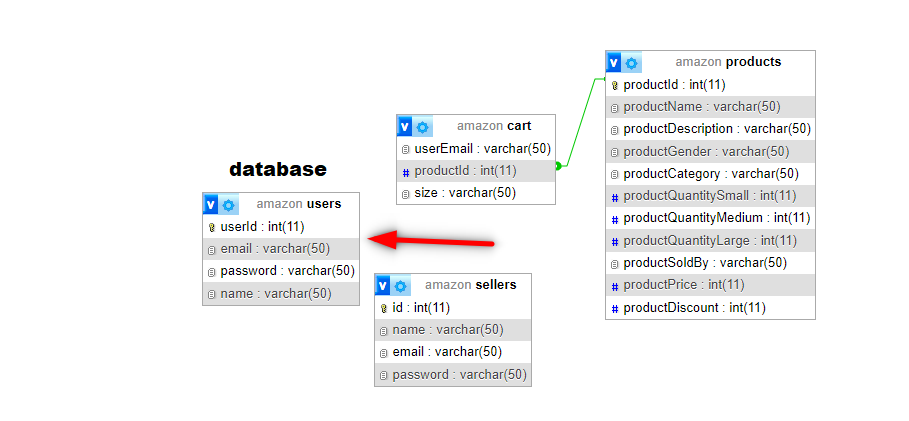
- MySQL Database: Set up a MySQL database to store product information, user details, and other relevant data.
- JSP and Servlet Libraries: Ensure that your IDE includes the necessary libraries for JSP and Servlet development.
Check 100+ JAVA Spring Boot Projects with Source Code
Step 4: Running the Web Application
Once you have completed the coding and set up the necessary tools, it’s time to run your e-commerce web application. Follow these steps to deploy your website locally:
- Build the project and generate a WAR (Web Application Archive) file.
- Copy the generated WAR file and paste it into the “webapps” directory of your Tomcat installation.
- Start the Tomcat server and wait for it to deploy your application.
- Open your web browser and access the web application using the designated URL.
Congratulations! You have successfully created an e-commerce web application using Java, JSP, MySQL, and Servlet.
Technologies Used:
- Java
- J2EE
- Servlets
- JSP
- HTML
- CSS
- Bootstrap
Tools Used:
- Tomcat Server
Hardware Requirements:
- Processor : Pentium IV
- Hard Disk : 40GB
- RAM : 512MB or more
Software Requirements:
- Operating System : Windows 10/ 11/7 or Linux
- User Interface : HTML, CSS
- Client-side Scripting : JavaScript
- Programming Language : Java
- Web Applications : JDBC, Servlets, JSP
- Database : Mysql
- Server Deployment : Tomcat 5.0
Step 5: Setup
Download and Extract Files:
- Download the project files in ZIP format and extract them onto your Desktop using a reliable tool such as WinRAR.
[Backend Setup]
- Open XAMPP: Start XAMPP and ensure that both Apache and MySQL services are activated.
- Open your web browser and go to http://localhost/phpmyadmin.
- Import Database: Within PHPMyAdmin, import the project database by selecting the “Import” option and choosing the provided database file.
[Front-end Setup]
- Open Eclipse (Download link): Launch Eclipse, ensuring a smooth initiation of the development environment.
- Import Project: Navigate to File > Import > General > Existing Projects into Workspace within Eclipse’s interface. Choose the root directory where your project is located and select the project before clicking Finish.
- Add MySQL Connector: In the project structure, go to Src > Web > lib folder. Integrate the MySQL Connector JAR file seamlessly into this designated folder.
Step 2: Run Project on Server
- Right-click on Project: In the Project Explorer, right-click on your project to reveal a contextual menu.
- Run As – Run on Server: Opt for “Run As” and then choose “Run on Server” to initiate the deployment process.
- Select Tomcat V8.0: Choose Tomcat V8.0 as the server for execution during the configuration.
- Next and Add All: Proceed to the next step in the configuration process. Click “Add All” to include all necessary resources and configurations for the project.
- Done: Complete the configuration process by clicking “Done.”
Step 3: Open Browser After Successful Setup
After completing the above steps, open your web browser and navigate to the specified local server address or http://localhost:8080/your_project_name to access and interact with your successfully set up project.
Screenshots


Step 6 : Download : (Note: Only for Educational Purpose)
Virus note: All files are scanned once-a-day by updategadh.com for viruses, but new viruses come out every day, so no prevention program can catch 100% of them
FOR YOUR OWN SAFETY, PLEASE:
1. Re-scan downloaded files using your personal virus checker before using it.
2. NEVER, EVER run compiled files (.exe’s, .ocx’s, .dll’s etc.)–only run source code.

- Free Download This Project :-Click Here
- Download All Free Project :- Click here
Document and Reports
This document file contains a project Synopsis, Reports, and various diagrams. Also, the abstract pdf file is inside the zip and you can modify it accordingly. Documents and Reports take 2-3 days to create as per the user Requirements
Conclusion
Developing an e-commerce web application requires expertise and a comprehensive understanding of Java, JSP, MySQL, and Servlet. By following the steps outlined in this article, you can create a powerful and feature-rich online platform for your business. Remember to pay attention to user experience, security, and scalability while developing your web application. Stay updated with the latest trends and technologies in e-commerce to continuously enhance your platform and provide an exceptional shopping experience to your customers.
Meta Description
Looking to build an e-commerce web application on Java, JSP, MySQL, and Servlet? This comprehensive guide provides step-by-step instructions for creating a feature-rich online platform.
Latest Post :-
| e-commerce web application |
| building an e-commerce web application with spring boot |
| e-commerce web application example |
| e-commerce web application github |
| build e-commerce web application |
Main Keyword: E-commerce Web Application on Java, JSP, MySQL, Servlet